Synchronize all your mailboxes on your own private email server
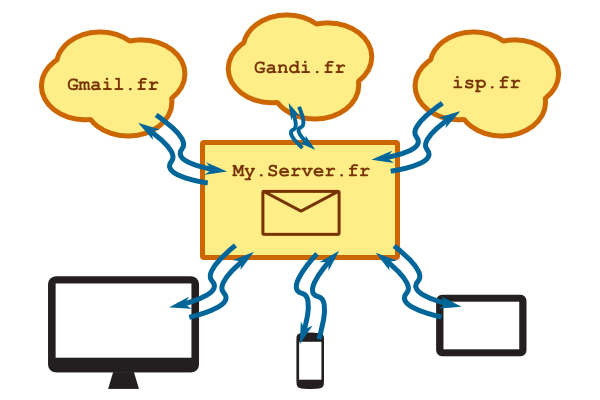
Everybody works from multiple devices nowadays. I do. And if you are like me, you want your data to be synchronized between your desktop, laptop, smartphone, tablet, and so on.
Let's take emails, for example. When I read an email on my laptop, it should automatically be marked as such on my desktop. When I send a message from my smartphone, I want it to appear in the "sent" directory of my laptop's mail reader. You get the point.
The thing is I use several email addresses. One for work, one for personnal stuff, one for every site that I manage, and so on. It makes synchronization much more difficult. And I want to read and send all my emails from a desktop client.
After fiddling around, I came up with a nice mail server configuration that brings the following features:
- Configure everything from a single place.
- Centralize all your emails on a single private place.
- Synchronize all your email clients easily.
- Allows me to use desktop client to read / write my emails.
- Works with several addresses and multiples ISPs.
Let's do this.
A bit of architecture
Here's an another beautiful image to help you understand the architecture we will be setting up. Of course, you need a personal server somewhere. Mine runs on Debian.
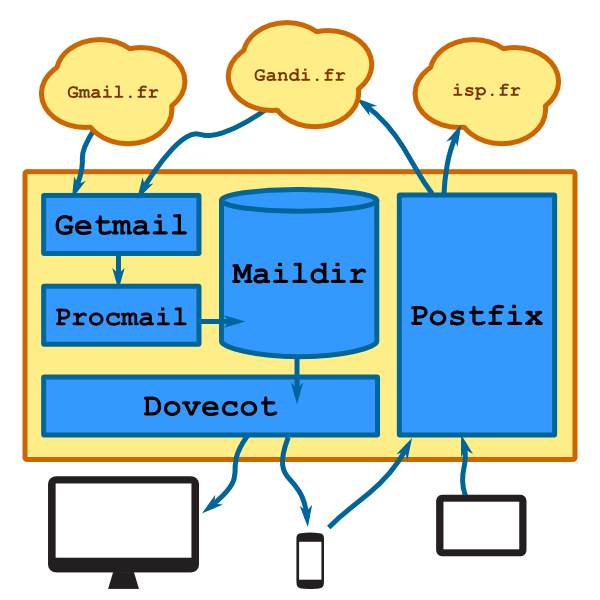
Every mail we receive will be stored in a Maildir formatted directory. This directory will be served by Dovecot using the Imap protocol. So every modification made by a mail client is synchronized on the server.
As for outgoing mail, we will route them to the correct smtp server depending on the sender's address using Postfix.
Configuring your mailbox
The first thing to do is to install and configure Dovecot to serve your Maildir directory using the Imap protocol.
aptitude install dovecot-common dovecot-imapd
vi /etc/dovecot/dovecot.conf
Here's a working configuration file.
protocols = imaps
log_timestamp = "%Y-%m-%d %H:%M:%S "
ssl = required
mail_location = maildir:~/Maildir
mail_privileged_group = mail

auth default {
  mechanisms = plain login
  user = root

  # Export the authentication system for Postfix to use
  socket listen {
    client {
      path = /var/spool/postfix/private/auth
      group = postfix
      mode = 0660
    }
  }
Don't forget to create the user's maildir directory. If you didn't create the user yet, now would be a good time.
adduser thibault  # this is my name!
maildirmake.dovecot  /home/thibault/Maildir thibault  # initialize maildir
/etc/init.d/dovecot restart
Now, you should be able to configure your mail client to access your brand new imap server.
Populating your mailbox
There is still some work to do before we go back on the beach to drink cocktails. Because your brand new mailbox is desperatly empty, and we need to populate it. This will be Getmail's job, with Procmail's help.
aptitude install getmail4 procmail
Don't forget to login as your user to configure those.
su - thibault
cd ~
mkdir .getmail
You will need one configuration file by email address. Here's a working example for Gmail:
#  ~/.getmail/getmail.gmail

[retriever]
type = SimplePOP3SSLRetriever
server = pop.gmail.com
username = myemail@gmail.com
password = mypassword

[destination]
type = MDA_external
path = /usr/bin/procmail
arguments = ("-f", "%(sender)", "-m", "/home/thibault/.procmailrc")
You should note that in the "destination" section, we tell Getmail to pass the message to Procmail instead of processing it by itself. You will also notice that we store the password in a file, and that sucks. Fortunately, you can secure your Google account so every application that accesses you Google account needs a different password. In the Google homepage, search in My Account > Security.
Every time getmail is launched, it will download every mail in your inbox. This is not a problem with Gmail, because read emails are archived, but it could be a pain with other providers. That's why we will add a few more configuration parameters to our files.
[retriever]
…

[destination]
…

[options]
read_all = false
delete = false
delete_after = 15
Don't forget to set some restrictive rights to protect your passwords.
chmod go-rwX ~/.getmail -R
Before we can test our configuration, we still need to configure Procmail.
Filtering incoming emails
Procmail's job is to dispatch incoming emails into the correct folder. All you need to do is to create a ~/.procmailrc file. Here's a minimal example:
MAILDIR=$HOME/Maildir/

:0
$HOME/Maildir/
With this configuration, every single message will go in the default inbox. Here's a better example:
MAILDIR=$HOME/Maildir/

:0  # Here is a new rule
* ^X-Spam-Status: Yes  # This is a condition
.Spam/  # Here is the destination for mails matching the condition

:0
* ^From.*coolclient\.fr  # Conditions match mail headers
.Coolclient/

:0
* ^(To|Cc|Bcc).*spamemail\.fr  # You can match several headers at one
.ProbablyTrash/

:0
* ^From.*annoyingfriend
* ^Subject.*FW  # You can add several conditions, they will be ADDed
.Friends.ProbablyTrash/  # Note the syntax for subfolders

:0
* ^To.*personalemail
.Friends/

# Don't forget the "catch all" rule at the end of the file
:0
$HOME/Maildir/
Let's test everything, still logged in as your user:
getmail --rcfile getmail.gmail --rcfile getmail.otherprovider --rcfile getmail.thirdprovider

getmail version 4.20.0
Copyright (C) 1998-2009 Charles Cazabon.  Licensed under the GNU GPL version 2.
SimplePOP3SSLRetriever:xxx@gmail.com@pop.gmail.com:995:
  0 messages (0 bytes) retrieved, 0 skipped
SimplePOP3SSLRetriever:xxx@xxx:995:
  0 messages (0 bytes) retrieved, 36 skipped
SimplePOP3SSLRetriever:txxx@xxx:995:
  0 messages (0 bytes) retrieved, 117 skipped
If you are lucky and carefully followed this tutorial, everything should work perfectly. Once you are sure that everything is ok, you can have getmail being launched regularly from a cronjob.
crontab -e

# Add this new rule to run getmail every five minutes
*/5 * * * * getmail -q --rcfile getmail.gmail --rcfile getmail.otherprovider --rcfile getmail.thirdprovider
Configure your email client
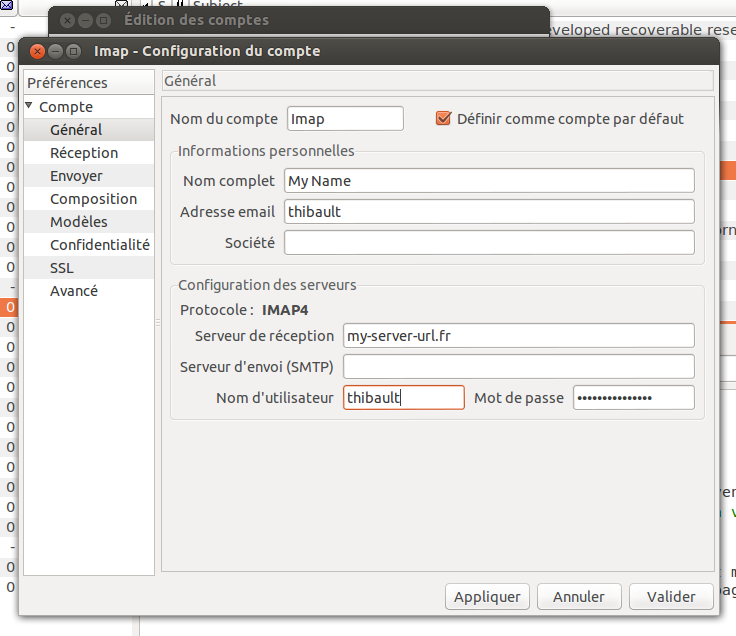
You could perfectly install a web server like SquirrelMail or Roundcube to access your emails from a web interface, but I prefer desktop clients. Claws mail is my absolute favorite ; it's light and fast.
To configure Claws mail (but those parameters will do with any other mail client), create a new account. In "Protocol" choose "Imap" and type in the address of your server. The username is the unix user you created earlier, and the password is the unix password. In "SSL configuration", don't forget to tick Imap > Use SSL….
Sending emails
Receiving emails is good, but sending them is better, right? We will now install and configure Postfix on our server to act as a SMTP relay. Indeed, we don't want Postfix to directly send emails, because spam problems are hard to overcome. Rather than that, we want Postfix to transfer outgoing mails to the correct smtp server (i.e the one of your provider) depending on the sender's address.
So if I send an email from my Gmail address, I want it to be routed through the smtp.gmail.com, but if I send it from my miximum.fr adress, I want it to be routed through Gandi's smtp, which is the provider I registered my domain name from.
First step, install Postfix (as root):
aptitude install postfix libsasl2 ca-certificates libsasl2-modules
Let's create a file to configure our routing table.
cat </etc/postfix/relayhost_map
myemail@gmail.com [smtp.gmail.com]:587
myemail@miximum.fr [mail.gandi.net]:587
myemail@otherisp.fr [smtp.otherisp.net]:587
EOF
postmap /etc/postfix/relayhost_map
You can also configure different TLS policies if different Isps take different parameters.
cat </etc/postfix/smtp_tls_policy
[smtp.gmail.com]:587 secure
[mail.gandi.net]:587 secure
[smtp.otherisp.net]:587 secure
EOF
postmap /etc/postfix/smtp_tls_policy
You also need to create a password database. For each line, the syntax is sender login:password.
cat </etc/postfix/passwd
myemail@gmail.com myemail@gmail.com:mygmailpassword
@miximum.fr myemail@miximum.fr:mygandipassword
@otherisp.net myemail@otherisp.net:myotherisppassword
EOF
postmap /etc/postfix/passwd
chmod 600 /etc/postfix/passwd*
Finaly, edit the Postfix configuration file, /etc/postfix/main.cf.
# Server side authentication
# I.e between your mail client and Postfix
# We will use the authentication mechanism exported by dovecot
smtpd_sasl_auth_enable = yes
smtpd_sasl_type = dovecot
smtpd_sasl_path = private/auth

# Restrictions in clients allowed to send us emails
smtpd_client_restrictions =
    permit_mynetworks, permit_sasl_authenticated,
    sleep 1, reject_unauth_pipelining
smtpd_helo_restrictions = reject_invalid_helo_hostname
smtpd_sender_restrictions =
    permit_mynetworks, permit_sasl_authenticated,
    reject_non_fqdn_sender
smtpd_recipient_restrictions = permit_auth_destination,
    permit_mynetworks, permit_sasl_authenticated,
    reject_unauth_destination

# TLS parameters
smtpd_use_tls = yes
smtpd_tls_auth_only = yes
smtpd_tls_cert_file=/etc/ssl/certs/ssl-cert-snakeoil.pem
smtpd_tls_key_file=/etc/ssl/private/ssl-cert-snakeoil.key
smtpd_tls_session_cache_database = btree:${data_directory}/smtpd_scache
smtp_tls_session_cache_database = btree:${data_directory}/smtp_scache

# Relay configuration
# We tell postfix that the relayhost to use depends on the sender address
sender_dependent_relayhost_maps = hash:/etc/postfix/relayhost_map

# Client side authentication
# I.e between Postfix and other smtp servers
smtp_sasl_auth_enable = yes

# We tell postfix to use different password depending on the sender's address
smtp_sender_dependent_authentication = yes
smtp_sasl_password_maps = hash:/etc/postfix/passwd
smtp_sasl_security_options = noanonymous
smtp_tls_CAfile = /etc/ssl/certs/ca-certificates.crt

# TLS parameters
smtp_use_tls = yes
smtp_tls_policy_maps = hash:/etc/postfix/smtp_tls_polic


# Other Postfix default parameters
smtpd_banner = $myhostname ESMTP $mail_name (Debian/GNU)
biff = no
append_dot_mydomain = no
readme_directory = no
myhostname = my.server.url
alias_maps = hash:/etc/aliases
alias_database = hash:/etc/aliases
myorigin = /etc/mailname
mydestination = my.server.url, localhost.server.url, localhost
mynetworks = 127.0.0.0/8 [::ffff:127.0.0.0]/104 [::1]/128
mailbox_size_limit = 0
recipient_delimiter = +
inet_interfaces = all
inet_protocols = ipv4
Once this is done, restart Postfix.
Sending emails from your client
We have configured an Imap account with Claws mail to receive emails. Now we need to configure accounts to send them. You will need one account for each email address.
Create a new account. In "email address", use your real email address, e.g myemail@gmail.com. In "Protocols" choose "None (SMTP only)" and type in your server's address. In the "Send" section, don't forget to check "SMTP Auth", choose "Automatic", and use the same username and password as before.
Done!
Done! We have a beautiful mail server acting as a proxy between all our devices and our multiple mail service providers. Now, there are a few thing we could do to go further, but I'll leave this as an exercice:
- Configure a regular backup
- Make sure our server's is up to date and apply security best practices
- Install and configure a web client like Mailsquirrel or Roundcube
Have fun!